
If you have been following me on Instagram in the last couple of years you may remember that in 2020 I vowed to develop the perfectly fitting shirt block. This turned out to be quite an endeavour since I’m by no means an expert pattern cutter, nor did I receive any formal training. I did however read several drafting books and while this helped me dramatically, I still needed a significant amount of trial and error to get it right. This is also partially due to the fact that a shirt has a lot of moving parts and even small changes have a sort of ripple effect on the garment.
In addition, I had a very precise idea in my mind. I wanted to achieve the perfect compromise between fitted and loose, a garment which could seamlessly transition from casual wear to being worn under a suit, and having the following characteristics:
- high, closely fitting collar in a shape which complements my face shape
- high and small armscye for better movement
- no bust shaping
- back suppression
- sleeves touching the thumb-palm connection
- shaped hem
- length conducive to tucking without escaping the pants every time I raise my arms
I’ve achieved what I think is a decent fitting shirt, but it is by no means “perfect”, nor is what some people would considered the desired shirt form. I’m going to share with you my many wearable muslin and also highlight what I did and what went wrong. As a simple caveat, keep in mind that I’m always going to wear these shirts tucked in so don’t @ me with comments on the length of my tails or wrinkling of said tails, haha. Oh, and second caveat: the direction of the button placket is completely arbitrary.
Exhibit A – Ornithologist on holiday
At first, I was mostly trying to get the shoulders and neck sections to fit more or less adequately, and I avoided collars altogether in favor of a stand collar. I knew that selecting the correct collar was going to be an entirely different can of worms, since I yet had to find out which shape best suited my face. I first tried with some bust shaping because I had already made the block previously and who am I to waste a perfectly good block! Enter the bird shirt, to date the most extravagant fabric I’ve even purchased.


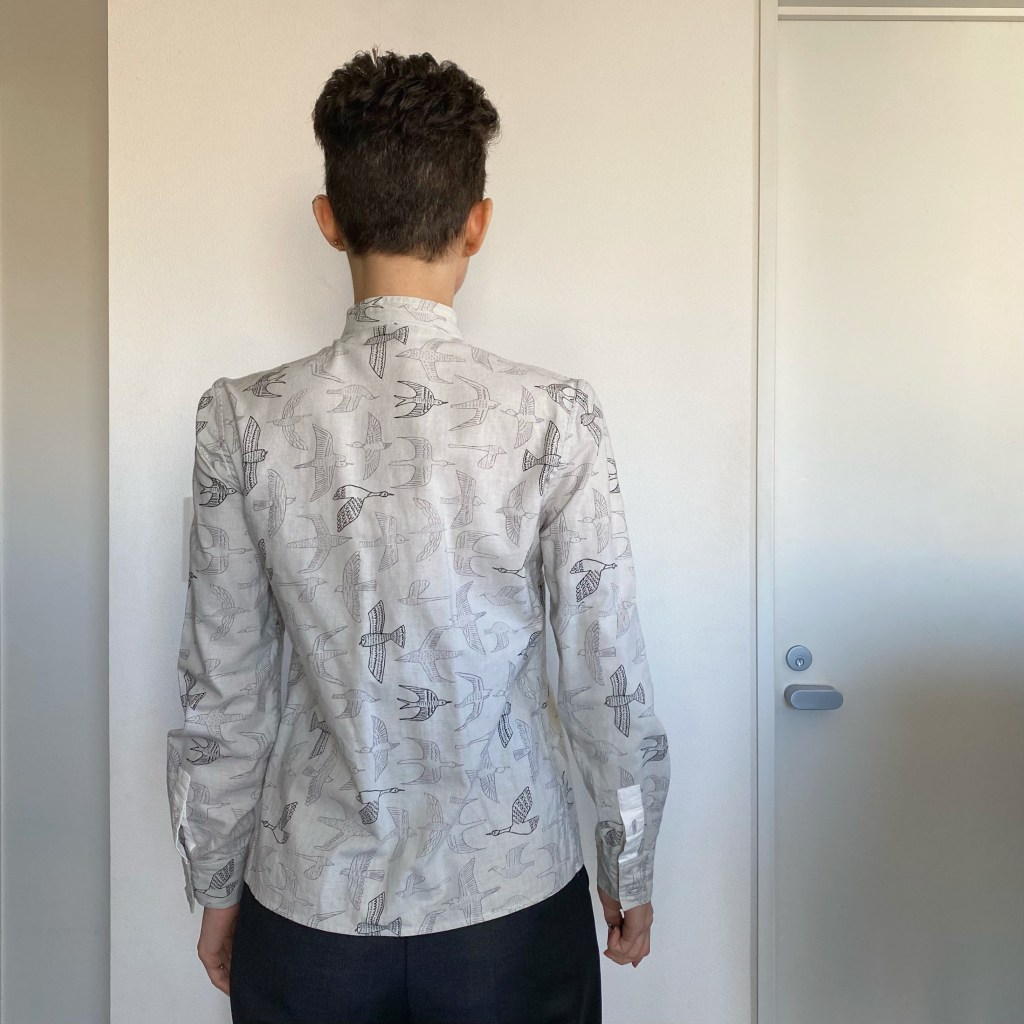
Besides the ornithological fun, there are several issues here.
To begin with, the bust dart gives me dysphoria. I realize bust darts are a way to conceal a bust, but I’d rather experiment more with fit than be reminded of societal expectations when it comes to my body (if you want to know why the link between busts darts-womenswear-womanhood-female bodies is problematic, look here). In addition, the collar is still pretty wide, though in this case I don’t mind too much since this style is never going to be worn with a tie anyhow.

I also found that the armscye is kind of low, which in turn impedes movement. Contrary to popular belief, a small, high armhole is more advantageous when it comes to ease of movement, so I immediately modified the armhole to fit high – basically just under the concave part of my armpit.
Moreover, this is a yoke-less model, reminiscent more of a blouse than a shirt, which serves the only advantage of sewing up in a couple of hours. According to David Page Coffin, the purpose of the yoke is to reinforce the back as well as to improve the fit of the back piece so it lies flat and comfortably under the jacket, by moving the shoulder seam towards the front – the so called extended yoke. The size of the yoke is mostly a matter or taste, thought I think larger yokes (extending past one’s shoulder blades) are more sporty. It’s clear from the picture that I needed a square shoulder adjustment here.
Last, I’m not a fan of this length: it’s too short, and tends to escape my waistband, and the lack of hem shaping (the hem is straight all around) hits weird. I’m glad I’ve made all these mistakes because otherwise I would have never know.
Exhibit B – You go wrong before you can go right
After the bird shirt, I moved on to adding a yoke as well as removing the front darts (you don’t say). I also wanted to tackle the neck issue so I not only added 1 cm to the fronts, but also to the neck section of the yoke. This only partially worked: on one hand, it did lift the front neckband up, which is a good foundation for the eventual insertion of a collar. On the other, though, adding to the yoke too meant that the shoulder section ended up being shifted downwards and there is some fabric bunching at the nape of my neck. Enter Exhibit B.


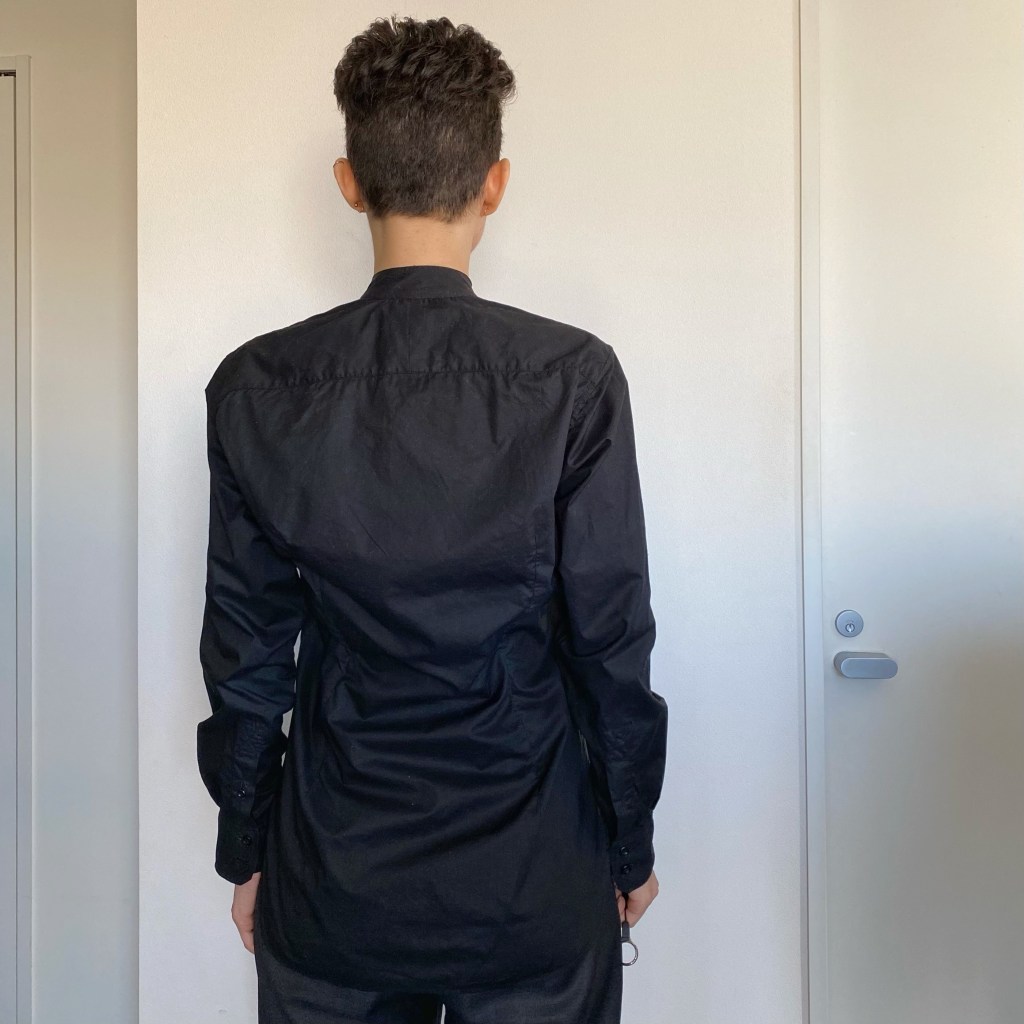
So, this wouldn’t be my blog if it didn’t come with controversy, so here it is: I committed the capital sin of disagreeing with the Page Coffin by adding fisheye darts in the back. I however think it makes sense in my context so hear me out. Page Coffin, at page 20 no less, goes on a three-paragraph-long tirade on why he hates back darts (they are “evidence of an ill-cut side seam” and “they make ironing the shirt back a complex chore” to mention just a couple of grievances. I suggest he buys a better iron). What Page Coffin seems to imply is that the only way to fit a shirt is to have it loose and add box pleats or gathers in the back to have what I’m left assuming must be MORE room for…not sure, but mostly what this achieves is to have it hanging shapelessly from the shoulders. While this is a look I have embraced myself for summer when I want no fabric touching my body, I must also say: good luck wearing a jacket on top! Especially given the fact that back suppression is one of the most prized features of fine bespoke tailoring (that means that jackets which closely follow the profile of one’s back are considered particularly egregious). The presence of fisheye darts makes sure the shirt fits closely and tuck in without unseemly extra folds. So take that DPC: not everyone like their shirt dangling down their body like a dead fish. I’m not saying that either of us holds the holy grail of shirt making: what I am saying however is that as with most things it depends on the context and your end goal, not to mention your own personal style.
I have to admit, however, that DPC is right about something: easy fitting these darts are not! Just look at this horror, evidence of the facts that I never do things halfway.

I have to admit though that this shirt looks pretty decent tucked in. The extreme back suppression (I should really just pick it out shouldn’t I) makes sure it fits inside my often overfitted waistbands nicely with no additionally folds, which is a plus I’m not going to underplay. However (I feel I’m Tuvok with all these “however”), there are still issues with the collar and shoulder area, not to mention the excessive ease in the yoke and back armscye. Uff. What a mess. I feel most of the fullness may be due to the rotation of the yoke due to my adding 1 cm to the neckline on the yoke.
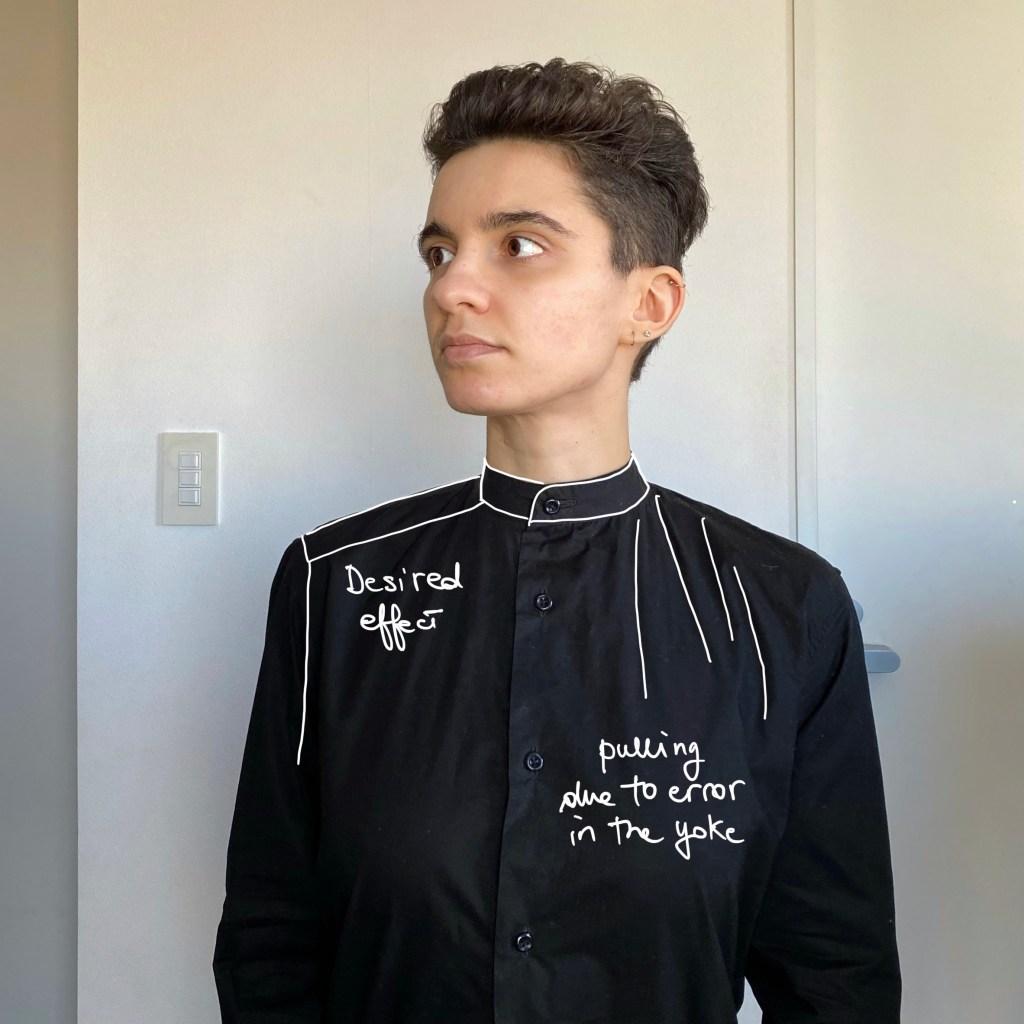
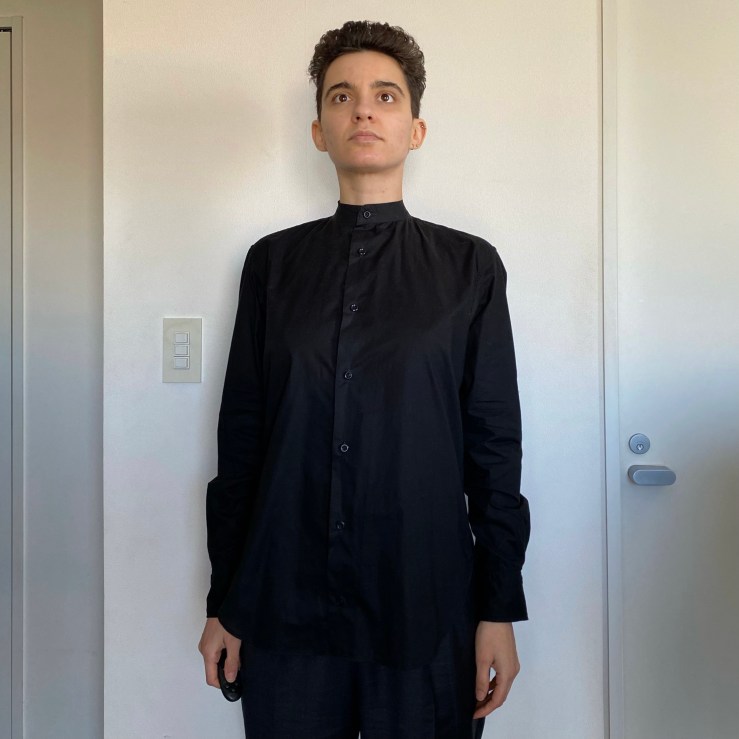
Exhibit C – Cozy no. 1
Now that I’ve indulged in this ultimate navel gazing exercise, let’s move on to Exhibit C. This belongs to a series of cozy shirts I planned to sew for the winter. This particular one is made of a very nice and nappy cotton flannelette purchased from Check&Stripe in Kichijoji, a boutique fabric store which deserves its own post.


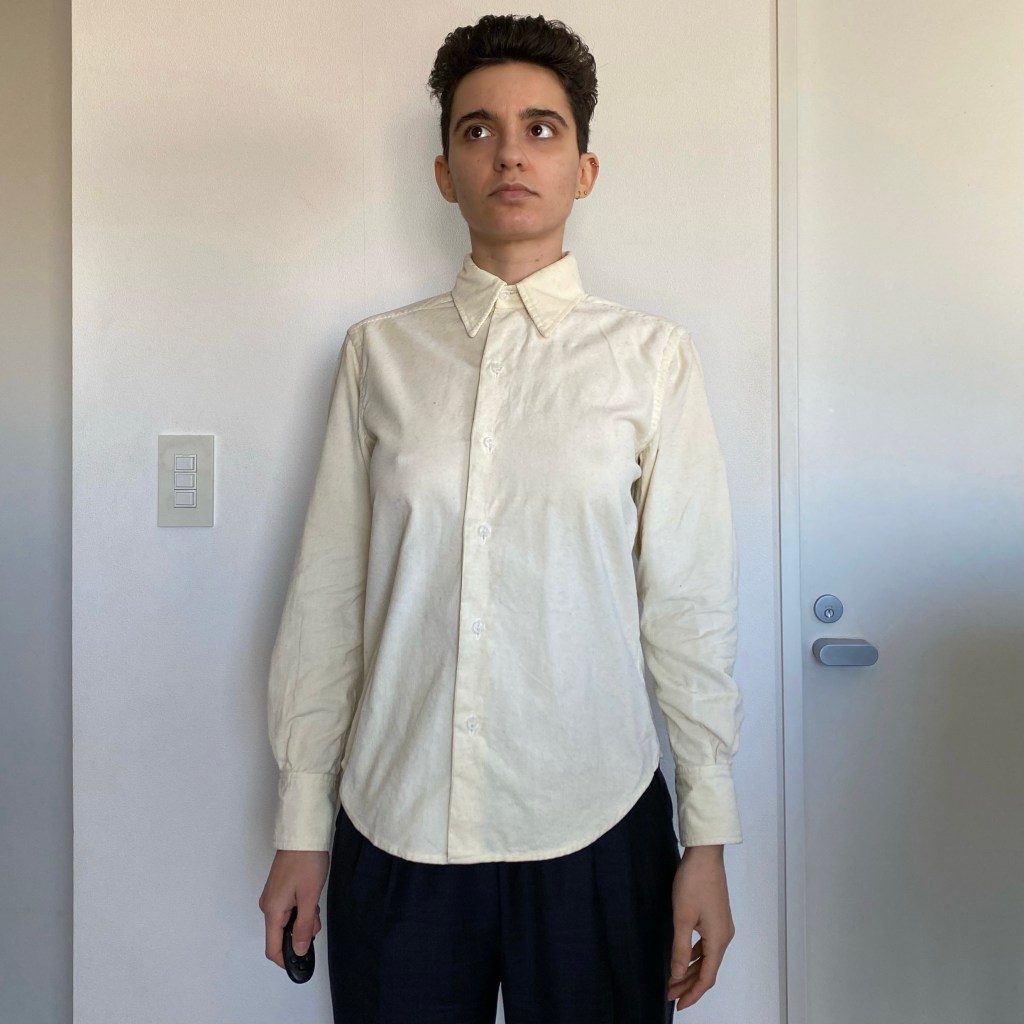
After long deliberation, I’ve found three collar shapes which work for me: the club collar, the standard collar with slightly extended points, and to some extent the compromise of the semi spread collar. In particular, I was keen of trying what in Japan is called the “turndown collar”: basically, the stand and collar joined together in one single piece. The way it was drafted in one of my books was quite suited to my face shape so I decided to try it in this shirt. Since the collar is less formal, it matched the relaxed flannelette perfectly.
As for mods, I went back to the original yoke pattern and left it alone, but I’m added 1 cm to the front pieces instead. I also raised the height of the stand section of the all-in-one collar by 0.5 cm. the result is appeasing though not quite high (or tight) enough, as explained in the following images.
In addition, the sleeves are slightly too long, I could use slightly more back suppression, and the fronts are slightly too short. These are very minor considerations when compared to the collar, which is literally the first thing one notices when looking at a shirt and being that this a causal, relaxed shirt I’m not too mad about them.
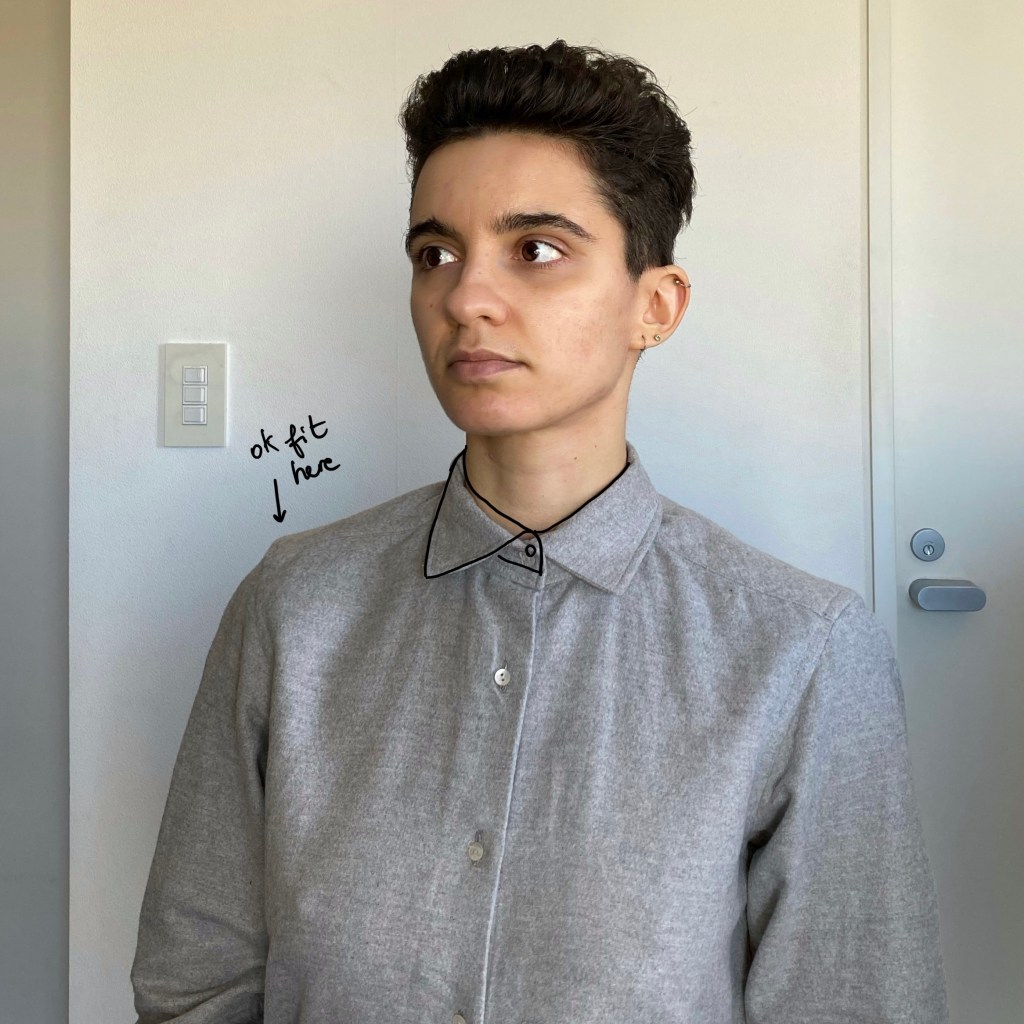
Exhibit D – Cozy no. 2


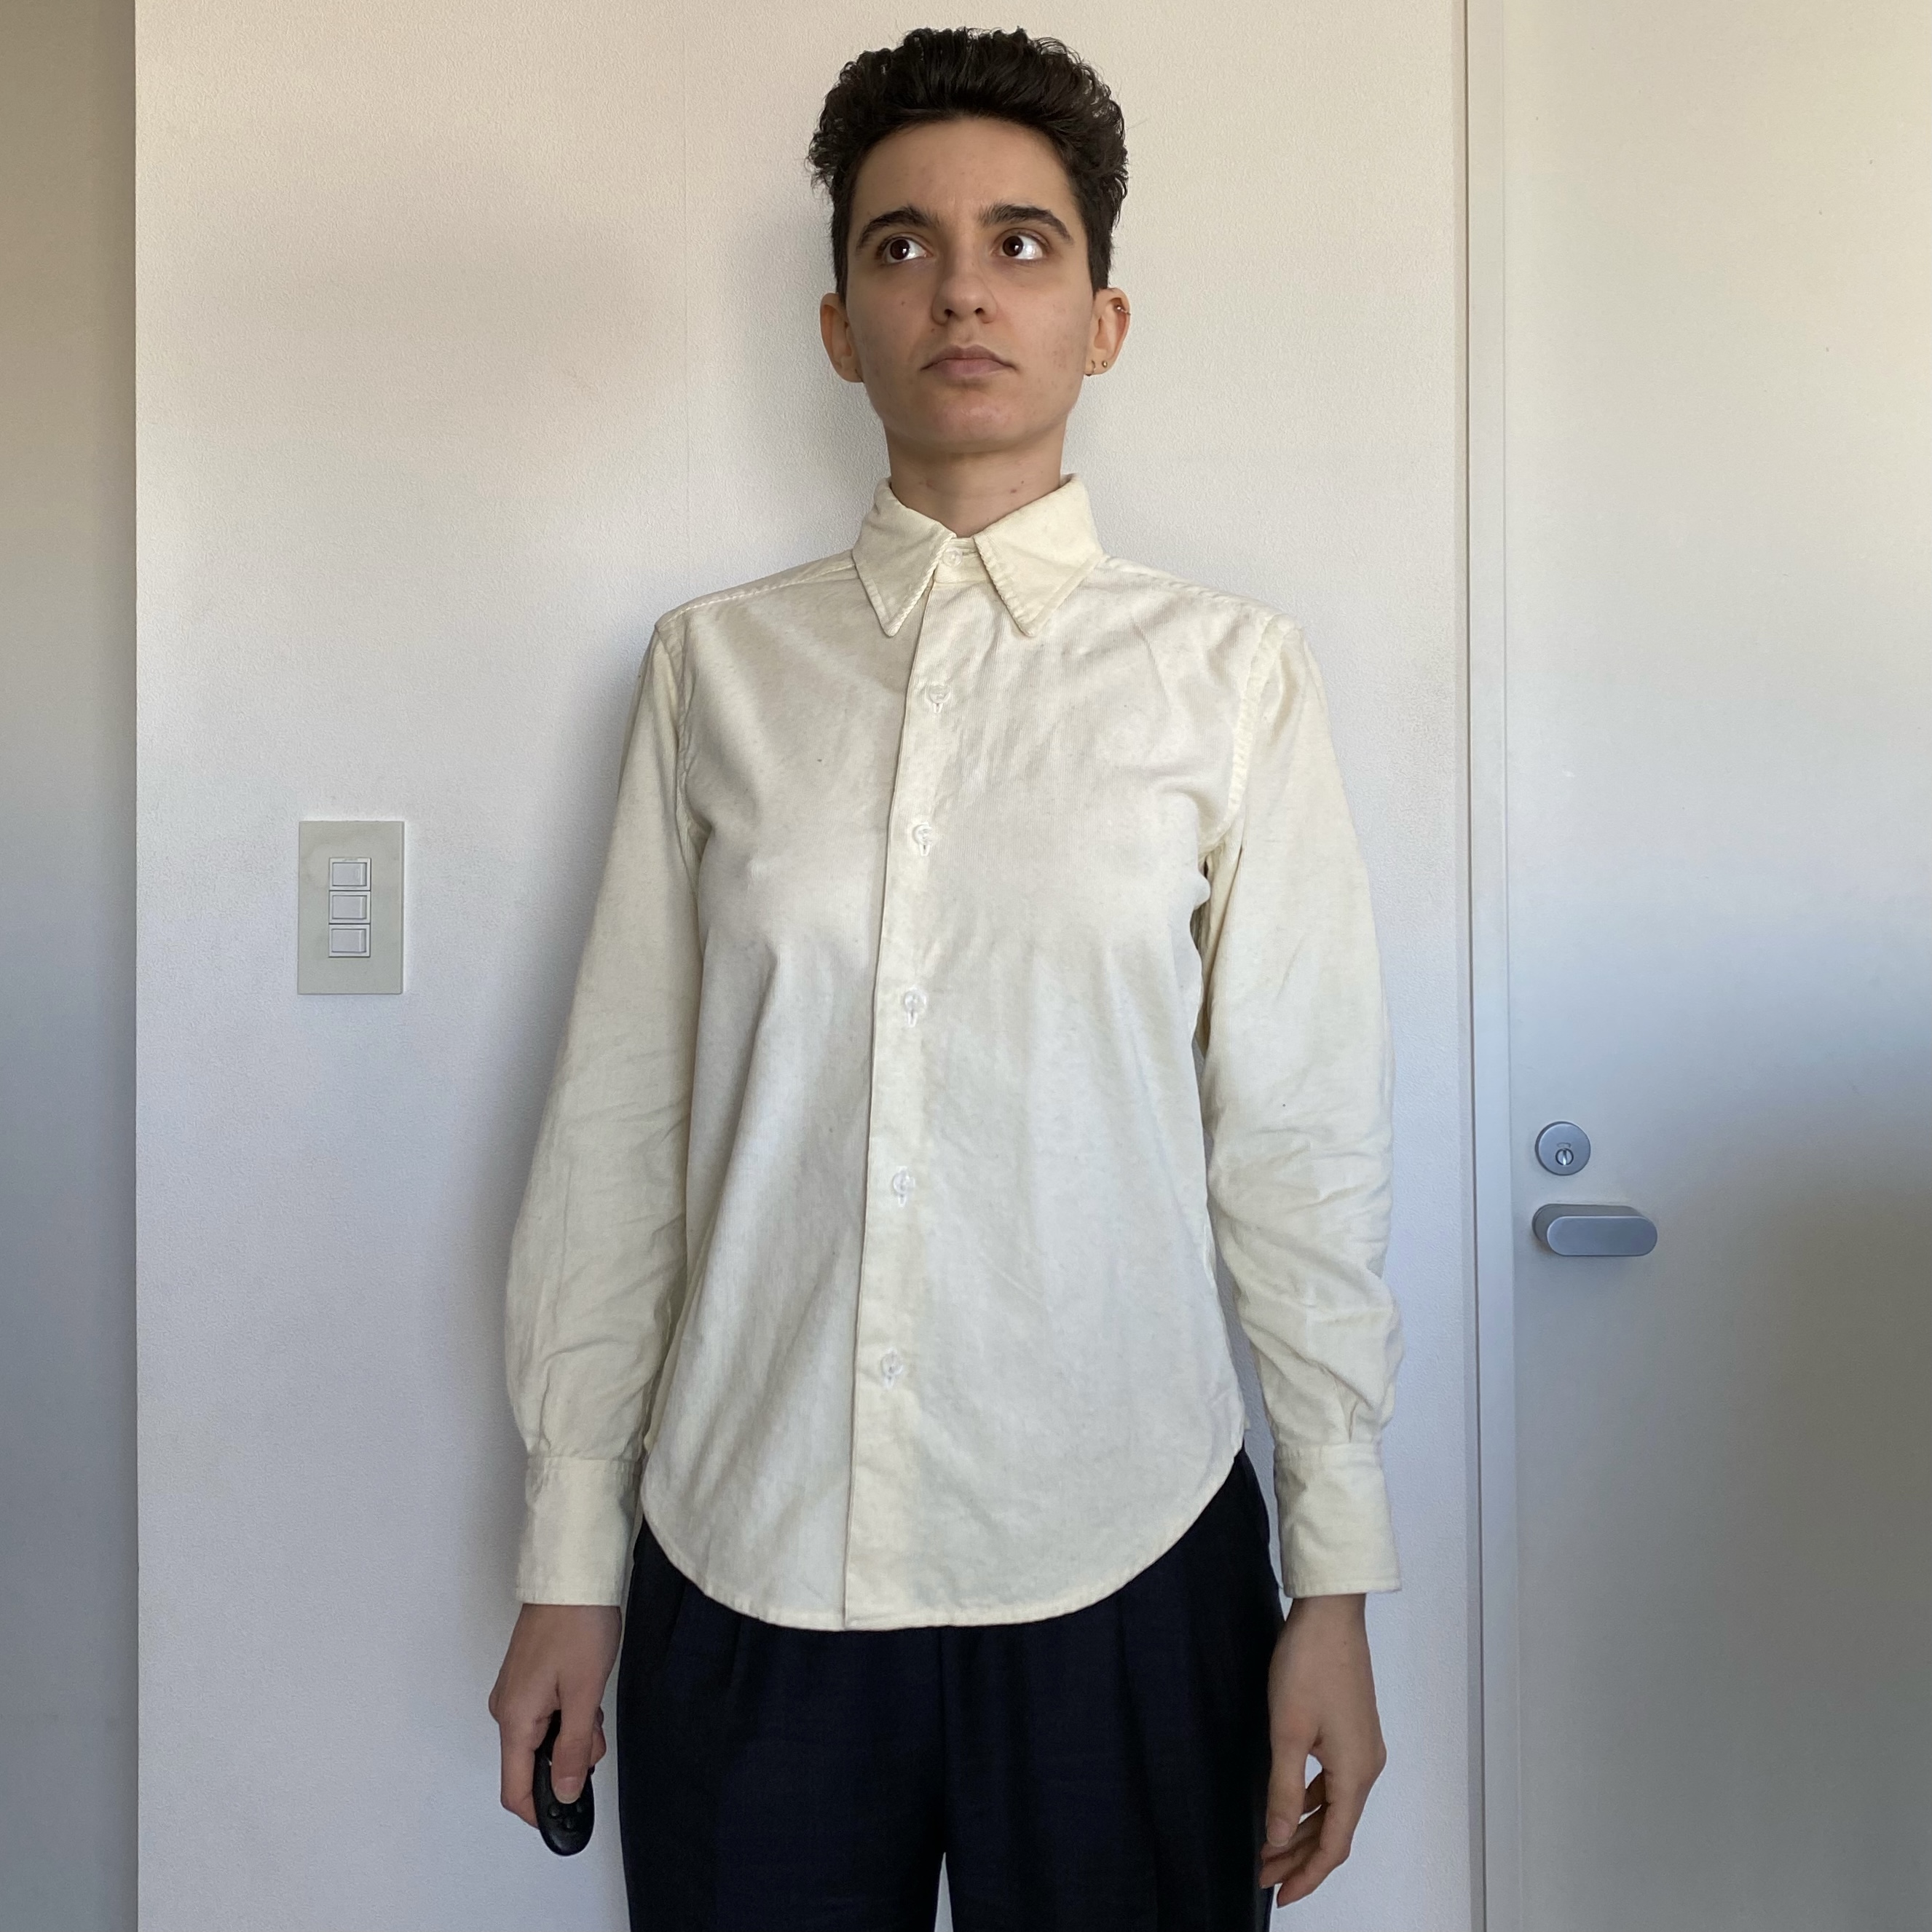
In the same trip to Check&Stripe I also purchased some ivory needlecord, a lovely and soft fabric I’m in disbelief I only started using this year. I enthusiastically cut the needlecord and made another version using the same pattern as the grey one but adding another 0.5 cm to the fronts. I also opted for a standard collar because I think it proportionizes my square jaw. This is quite a large collar: the tips are 8 cm long, and the stand is 4 cm high at the center back. However, it looks proportionate on me because of my long neck.

This is, I believe, a very important point: sewing in general and tailoring in particular is all about proportions and achieving the effect you want. Never let anybody tell you what you are doing is “wrong” because it’s different from how they do it. As my friend Sorai-san says, there are multiple right ways to achieve the same result. What’s important is the message you want to send with your clothes.
I believe this collar and neck width is more or less correct – plus or minus alterations which will need to be considered depending on fabric choice. I did however find a couple of things to modify next time: the back tails tend to run up a bit due to my full derrière (dat ass) and I think adding a wedge at the side seams would help that. I would also like to shape the back slightly more by repositioning and taking in the darts slightly more in future versions, especially in the two nice shirtings I saved for what feels like years at this point.
I did not want a very fitted shirt – the ones Husband-san wears – and I think I have achieved the fit I was envisioning at least in the front. The presence of breasts complicates the issue, but it’s not unsolvable. The back still needs some work and I’m planning to pick out all the back darts and pin them on myself to remove some of the fulness in the thoracic area.
To sum up, I’ve come a long way from the first shirt I made over a year ago. It actually never really dawned on me until I put this post together and the following image, comparing the shirts side by side.


I still have much to learn when it comes to shirt making, both at the skill level and at the fitting one. I’m very excited to have made it this far because I am now ready to start working on my blazer block – which I started and never finished, so I have a half made suit in my closet now.
If there is interest in it, I can make one or more posts with my top tips for confident shirt making, including how to sew the sleeve with only 1 pin, how to insert the collar precisely, and some notes on construction order which, in my opinion, make life easier. Let me know in the comments or DM me on Instagram. If you enjoy my content please consider supporting my work here.
Cheers,
E

[…] One of the most challenging aspects of shirt making, in my opinion, is determining which collar shape best suits one’s face. I’m not in the business of telling you what you have to do or not, just to show what I believe harmonizes a face…but these are by no means rules! Take is as a proportion thought exercise, because tailoring is all about proportions. Also keep in mind that the stand is also crucial when it comes to collar fitting (just look at how much difference the stand hight makes in my previous shirt post here). […]
LikeLike
Enjoy your posts. Thank you. On shirt fitting you may find Alexandria Morgan’s explanation of balance lines helpful: https://www.inhousepatternsstudio.com/. She does like darts, but the principle is sound without them. Her explanations revolutionized my fitting process.
LikeLiked by 1 person
Thank you for this. It was very interesting following your journey. I’ve only just started making shirts so it can be quite intimidating making alterations to patterns, I’ve sort of been afraid to mess with things because I don’t really know how something like the yoke functions or it’s purpose- time to do a deep dive.
I’ve currently just been making the Cornell shirt and I quite like it’s oversized fit and simple band collar, but I definitely want to experiment with different collar shapes.
LikeLike
It never ceases to amaze me how challenging it is to draft, sew and fit something as ubiquitous as a dress shirt.
Reading your post reminds me I need to go back and revisit my dress shirt block. Thanks for sharing your journey.
LikeLike
[…] Previous Post Shirtmaking adventuresNext Post Attaching a shirt sleeve with 1 pin: myth or reality? […]
LikeLike