
Last year I wrote about the jackets and their components. In compete honesty, I am more of a maker of pants than of coats: I always say that not everyone wears blazers, but everyone wears pants! There are so many things to consider when making pants, from raise, to pleats, to ease, to cuff…the options are truly endless and I always enjoy mixing and matching different features when developing new patterns for myself. Unfortunately, there seems to be a lot of confusion when it comes to the correct (or at least traditional) nomenclature, mostly due to tailoring schools themselves naming the same items different ways, or using the same terms to mean totally different things…In addition, I often see people misnaming pleats and waistband styles so here it is, the ultimate, unequivocal, non plus ultra guide to pants….lol (#SarcasmAlert).
Waistbands Galore
The first thing to consider when looking at a pair of pants is the waist. We are all used to the separate waistband, with sizes varying, but generally being around 3-4 cm. I personally like a a very tall waistband (5 cm and counting) but it is definitely “a look”. You an play around with the way the waistband closes, from a classic form to a more casual and utilitarian Gurkha.
Another option which I have experimented with is the grown on waistband (also referred to as “Hollywood waist”, because it was popular in the 1950s and 60s, the supposed golden age of Hollywood). This type of waist features a facing instead of a separate waistband piece. I find it very very nice especially when paired with pleated pants. It’s also a very comfortable style in my opinion.

The back of your waistband is also important: by doing a split waistband, you can tuck some extra fabric in, which can be useful if you need to let the pants out. In addition, doing a dovetail back has the added benefit of giving the waistband “spring”, useful for movement and essential for suspenders wearing.

Keep the pants on
Now, onto the options to prevent you from losing your pants: belt loops, tabs, and suspenders. Personally, I hate belts and I never put belt loops on my trousers, opting instead for suspender buttons. Because I now exclusively make pants with pleats, the presence of suspenders has not only the added benefit of permitting a slightly wider waistband (which, as a soup lover, I can second), but also of creating some tension which keeps the pleats straight. Neapolitan tailors will often put both belt loops AND suspenders buttons because life is too short not to have options, lol. Generally speaking, I have the impression that a belt should not be worn with a suit because it interrupts the continuous line make by jacket + pant. Another option to avoid losing your pants along the way is to add tabs on the side. Both this and suspenders have the added benefit of not interrupting the continuous line which goes from pants to jacket, which is an effect apparently sough after by lovers of tailoring (rather, lovers of the act of wearing said tailoring), who also swear by higher rises for the same reason.
Pleats Please…or Maybe Not
As far as I understand, there are two camps of people: pleaters, and everyone else haha. Joking aside, pants can be flat front (= no pleats), or have one, two, or more pleats (I’ve seen up to 4 which even for me is a tad much). The advantage of pleats is room and ease, which according to some is the negative of pleats. As with everything, you do you. I get that pleats give a very vintage vibe, which is not everyone’s cup of tea. And that’s ok!
Now onto the piece on information you were all looking for: the correct way to name pleats direction! When pleats are towards the center front, we call them “forward pleats”. The opposite is called “reverse pleats”. There. Now we all know.
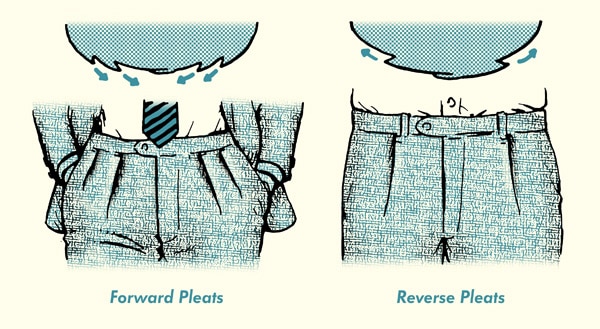
I have experimented a lot with pleats and, for me and my body, reverse pleats – both when having a single and a double pleat – are the way to go. If you are into pleats, try one way or the other and see what feels better.
Pockets
As with other aspects of pants, pockets are a matter of taste. Most pants these days have slanted pockets, though I personally love a good inseam pocket. These are standard in Neapolitan tailoring, and are also very unconscious. The trick lays in being able to fit it well and sew the side seams close enough not to have them open when stationary (opening while walking is inevitable). Other types of pockets, such as Western pockets and frogmouth pockets, exist, but I have never seen one in the wild except in historical costuming.

Fly
I get it, the fly is not exactly an..unusual part of pants. I decided to add it mostly because there are many time intensive ways to jazz up ones fly, which I personally really like. Honestly there are endless options for quirky styles out there so plenty of inspiration (especially for the lover of buttons).

Cuffs
Cuffs periodically go in an out of fashion, but besides that, as it is the case in most tailoring-adjacent questions, it is mostly down to style and proportion. What I can say is that if you, like me, are a lover of pleated pants, then you should cuff them. This is for two reasons: to provide visual balance to the pant leg, and to give some weight which helps keeping the pleat and crease line straight. Many trad style bloggers will carve in stone rules regarding the “correct” size of a cuff (they say from 3.5 to 5 cm max), but I disagree: in my opinion, the only important aspect to keep in mind is the size of your foot, and proportionize the cuff from that. My feet are tiny for size (I wear a EU 36) so my cuffs are tiny too, 3 cm in height.
Break
The break of pants is the distance between the hem and the shoe. There are three traditional options:
- No break: the hem reaches the shoes but doesn’t touch them
- Half break: some touching is involved, forming a little dimple on the front of the hem, and not in the back
- Full break: a more evident dimple is present, again in the front and not in the back.

Another thing to consider is that the width of your pants will influence the break, with more tapered pants needing to be shorter to achieve the same break. Cuffed pants, in addition, generally have no break. If your hem is wide, take into account an angled hem as well! This creates a great silhouette and is definitely a look of an era.
That’s all for now! Let me know if you have specific questions you’d like me to cover.
Cheers
E

Love all the details! It’s good to have the vocabulary to discuss tailored trousers.
LikeLike
Honestly this was so interesting to read, thanks 🙂
LikeLike