
This is part II of an ongoing series on wasai. Look here for part I, which deals with measuring yourself and cutting your pieces, and here for the introduction.
Now that you have your pieces cut, you need to mark them, since wasai doesn’t allow for notches, and the seam allowance (SA) varies depending on where the seam is and your final garment measurements. With this I mean that a smaller kimono will have more fabric tucked in the SA than a larger kimono, and in both instances nothing is cut. Magic!
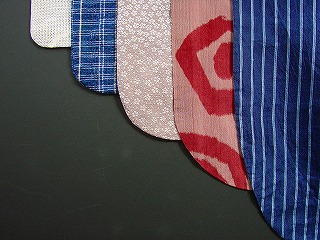
Traditionally, wasai tailors use a special kind of marking tool called へら/hera, pictured below.

Used in combination with a へら台/hera dai (hera board), one marks the fabric by applying pressure with the hera onto the fabric so to produce a little indent. This way, the tailor can easily mark both layers of fabric at the same time. Another option is to merge pressure with heat by applying the iron used in wasai, the 和裁こて/wasai kote. Alternatively, if you are using your hera as a bookmark, the cat ate your hera dai, and you can’t find the plug for your kote socket, or with fabrics difficult to mark with a hera such a wools and synthetics, one can use tailor tacks, as I have done below. This is way more tedious so I would suggest procuring a hera (why can’t I stop thinking of epoxy spatulas?), since this is much cheaper than a kote, and buying/making your own hera dai to use when possible. Anything with a harder back and a cloth top which is not too thick and fluffy will do. Here is an example of a hera dai.

Now that you are more or less set, let’s bring back the handy table from the previous part, AND add MORE measurements, haha! Fun! New measurements are in bold.
| Name | Range (no SA) | Notes |
| Sode take (sleeve length) | 49~53 | Can be changed according to preference |
| Sode guchi (sleeve opening) | 21~28 | |
| Sode marumi | *see below* | Roundness of the bottom of sleeve (preference) |
| Sode tsuke | 21~23 or 40-43 | Second range if no miyatsuguchi |
| Sode haba (sleeve width) | 32~36 | Yuki minus kata haba |
| Mitake (length) | Depends on your height | |
| Eri kata aki | 8.5~9 | |
| Miyatsuguchi | 13 | Not in kimono with no miyatsuguchi |
| Yuki (center back to cuff length) | 62.5~68.5 | Depends on your wingspan |
| Kata haba | 30.5~32.5 | Yuki minus sode haba *see below* |
| Ushiro haba (back piece width) | Depends on your hip, see above | |
| Mae haba (front piece width) | Depends on your hip, see above | |
| Okumi haba | 15~16 | |
| Okumi sagari | 21~23 | |
| Eri shita | 68~80 | Mitake × ½ |
| Aizuma haba | 13.5~14.5 | Okumi haba – 1.5 |
| Eri haba (collar width) | top 5.5, bottom 7.5 | Top is CB, bottom is bottom edge of collar |
While most of these terms will become clear later, I want to spend a moment to explain the sode marumi. This refers to the size of the curve at the corner of the sleeves, and is generally, rather than guesstimated, calculated using the handy tools below (from the Clover website)

If you can’t access one yourself, you can make this tool using card stock, as the length is simply calculated by measuring from the beginning to the end of the curve. The effect is quite striking, as you can see from the image below. While very curved sleeves are much more practical – less fabric getting in the way – and were historically preferred, nowadays most kimono feature angular sleeves. Pick what you like most, even the kimono police can’t argue with you.
Another item I want to spend some time to talk about is the kata haba (shoulder width). While this is technically yuki minus sode haba, and geometrically one would think it’s the same as the ushiro haba (just look at the picture below), it’s been my observation that making the kata haba slightly larger (think half a centimeter) than the ushiro haba is beneficial to the general silhouette. For example, if your ushiro haba is 30 cm, make the kata haba 30.5 cm and so on.

Now that I have bored you to death, let’s move on to the actual marking, shall we?
1. Marking the sode
Take your sleeve pieces and turn them right side up, folded with wrong sides together. Stitch on the green line (top figure), then flip them wrong side out, right sides together. Mark with your instrument of choice the various SA, the sode guchi, sode tsuke, and the marumi. You don’t have to mark excessively, just enough for you to remember where you are going.

2. Mark the back body
At this point, take the body pieces and place them right sides together, with wrong side facing up. Fold the left half toward the right half (so wrong side of one body piece are together now, and you have another wrong side of half of the other body piece up towards you). Now move onto the markings:
- Mark the hem allowances.
- Mark the center back (CB) seam line. This is an easy one, 1 cm.
- At the midpoint of the body piece (your fold line), mark the eri kata aki and cut it. I recommend 9 cm, so that your total cut will be 9 cm + 1 cm of SA = 10 cm.
- Then, mark all the remaining parts: sode tsuke and our friend miyatsuguchi, kata haba and ushiro haba, referencing the figure below. Remember these are the finished measurements of each piece, to which you have to add the amount stated in the figures. For example, you will make the distance equal to kata haba + 0.4 cm.
Pin the back pieces together in some fashion, as well as the front ones, to avoid shifting in the next step.

Once the kimono is worn, the midpoint will shift towards the back, and the Katayama (the equivalent of the shoulder seam in yosai) will move to the front. Just remember that the Katayama is 2 cm to the left from the eri kata aki, as you can see in the figure above. The consequence of this jive is that you will now have an excess equal to the distance between Katayama and eri kata aki (2 cm in our example), called kurikoshi. There are various ways to deal with this but for the sake of brevity and simplicity I have decided to ignore it in this brief series of tutorials, so you may just cut the excess off at the hem after the complete construction. This is a legitimate method, especially when pattern matching is important like in formal kimono, and even my wasai teacher applies it. If you would rather not cut, to keep it zero waste, you can make a tuck as wide as the kurikoshi, 4 cm below the miyatsuguchi as indicated above, and sew it shut.
3. Mark the front body
At this point, you can unfold the pieces, so that the backs are to your left, and the fronts to your right, still right sides together. Do so by lifting the two top layers now on your right hand side and bringing them to the left.

- First, check that the hem allowance, sode tsuke, and miyatsuguchi transferred correctly.
- Now mark the okumi seki using the okumi sagari. We are referring to the eri kata aki + SA as ⦾; the “height” of the okumi seki is ⦾ – 1 cm. You have determined your okumi sagari previously (21 ~ 23 cm, would venture to say that 21 fits most people, 23 if you are very tall. I’m 170 cm and 21 cm is fine). Now look at the diagram, you see there are many 0.3 cm marked here and there. Use these to determine the trajectory of your okumi sagari (and later to sew, so refer back to this graph) as follows: the beginning of the sagari is equal to ⦾ + 0.3 cm, which you are going to mark on the Katayama. The height of the end point of the sagari is ⦾ – 1 cm. Place the end point of the okumi sagari such that the linear distance between it and the beginning point of the sagari is the okumi sagari measurement. Make sure the height is in fact equal to ⦾ – 1 cm.
- Mark the mae haba + 0.4 cm.
- If you have a large difference between the kata haba and the mae haba, as well as the okumi seki and the mae haba, mark the SA as a gentle slope.
- Mark the eri kata mawari as shown in the figure. This is going to be your SA for when you sew the collar on. After marking it, measure it as well since you’ll need this length for the collar markings later on.
- Measure the okumi take (okumi seki to hem) since you will need it when marking the okumi.
4. Mark the okumi
Place the two okumi pieces on top of each other, right sides together.

Now mark as follows:
- Mark the hem allowance.
- Stating from the hem, mark the starting position of the erishita.
- Mark the Aizuma haba + 0.2 on top of the point you just marked.
- Mark the SA of the non-selvedge side (1.5 cm) between the erishita point you just marked and the hem.
- Now mark the okumi haba + 0.2 cm. Call the distance between the selvedge and the top end of the okumi haba ⌀.
- Now mark the okumi seki, on the opposite side of the hem. Take the okumi take measurement you achieved before and use it to find the horizontal position of the okumi seki, its “height” being ⌀ + 3 cm.
- Connect and mark the okumi seki to the Aizuma haba + 0.2 point you marked in ③, and this to ⌀. This should be equal to the okumi take.
- Mark a point 0.3 cm below the okumi seki and connect this diagonal line to the eri shita mark from ②.
5. Mark the eri and kake eri
In our example we are doing what’s called a ばち衿/pachi eri, which is more casual and completely closed, as opposed to the 広衿/hiro eri, which you fold down to your preferred width yourself. The bachi eri is less wide at the CB than at the bottom (the eri seki) so mark accordingly as illustrated below.
First we need to cut apart the eri proper from the kake eri. The kake eri was originally designated as the part you would unsew and change because contact with skin, makeup, grime of living, would dirty it. To determine the eri take (collar length) apply this formula:
Eri take = (mitake – eri shita + eri kata aki + eri seki SA 5 cm) × 2
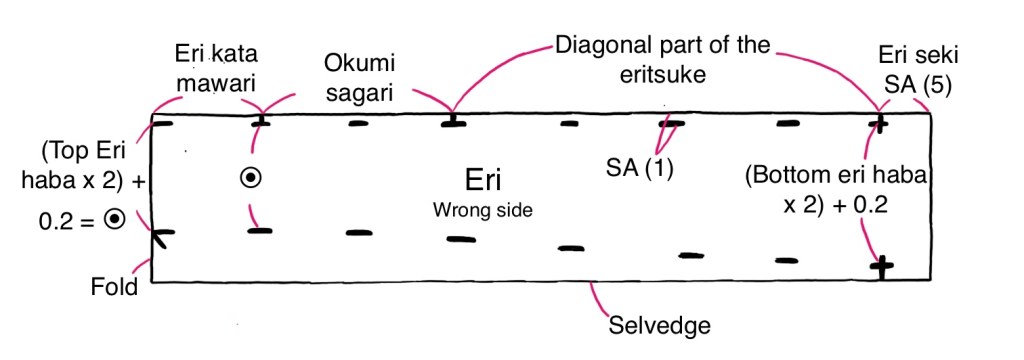
Now fold the eri in the middle and mark as follows:
- Start by marking the SA on non-selvedge edge (1 cm) and the eri seki SA (5 cm)
- Mark the eri kata mawari and the okumi seki.
- Now make the top eri haba (5.5 cm in our example) × 2 + 0.2 and designate this measurements as ⦿.
- Mark the cotton eri haba (7.5 cm in our example) × 2 + 0.2
- Mark the slope between top eri and bottom eri as illustrated, keeping in mind ⦿.
To determine the Kake eri length, use this other formula:
Kake eri take = (eri kata mawari + okumi sagari + 7 cm + SA 2 cm) × 2

Fold the newly acquired Kake eri and mark the side SA (1 cm) and the bottom SA (2 cm) as illustrated.
And we are done! Admire your hard work and get ready for sewing, yay!
Emilia

[…] series on wasai. Look here for part I, which deals with measuring yourself and cutting your pieces, here for part II to learn to mark the pieces, and here for the […]
LikeLike