
This is part III of an ongoing series on wasai. Look here for part I, which deals with measuring yourself and cutting your pieces, here for part II to learn to mark the pieces, and here for the introduction.
Now you have marked all the pieces, and are ready to sew: congrats, the hard part is behind you, let me assure you. When it comes to kimono sewing, the tradition dictates it should be entirely done by hand, with a technique called 運針/unshin, basically a rapidly executed small running stitch. However, I don’t think this necessarily yields better results, not to mention it is not accessible to everyone. Modern machines, especially the ones equipped with blind hem capabilities, should achieve the same results with minimal strain on your hand, as many RTW kimono one can buy now can attest. The only advantage of sewing by hand in this case is the fact that the very nature of unshin is loose, closer to a basing stitch, therefore if stress is put on the seam the yarn will break before the fabric does, which is fundamental in wasai (the fabric being the most precious item). When I sew by machine, I solved this issue by using longer stitch length (3~4 mm) as well as lower tension. I also started using silk thread instead of polyester thread because the former, while very strong, will naturally deteriorate with time, giving me the opportunity to reassess the sanity of my seams.
The order I generally follow when sewing is as below:
- Sewing the sode
- Center back seam + kurikoshi
- Side seams
- Okumi
- Eri
- Kake Eri
- Attach sleeves to body
Before we begin sewing, I want to stress one important aspect: you’ll see in many diagrams the stitch line is a few mm removed from the fold line. This is because you should always allow for turn of cloth when sewing kimono.
In all figures green represents sewing, and magenta represents markings or other extra information.
Now let’s begin.
1. Sewing the sode
When marking your sleeves you should have sewn the bottom shut as indicated in the picture below. You should have also marked the curve of your Marumi.

Now it’s time to complete the sewing of the sleeve. From the sode guchi, sew down the length of the sleeve until you reach the Marumi, and continue sewing the bottom edge. Remember the location of that bottom edge depends on your Sode yuki.
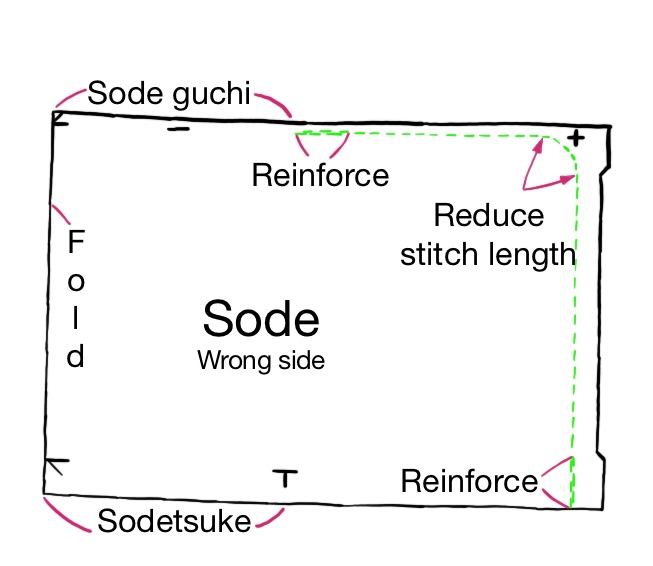
To make the Marumi, refer to the diagram below, considering how rounded you want it to be. I believe it helps to sew multiple rows of longer stitches (~ 4 mm) with long tails, and then pull these tails to turn the cloth. Use a piece of cardboard or this handy tool as a guide for the curve, and secure the excess fabric with some loose basting stitches.

Now you can finish up the sleeve by sewing a rolled hem at the sode guchi. It doesn’t have to be very tiny, about half a centimeter will suffice. After that, flip the sode so the right side is on the outside, and give it a nice press.

2. Center back seam and kurikoshi
At this point, take your two body pieces, and place the back sections of the body pieces right sides together, the separation point between back and front being the eri kata aki you have already cut when marking your pieces. Pin the pieces and stitch them together twice, then fold the SA to the right hand side, allowing for a slight turn of cloth (~ 2 mm).

At this point, you can sew the Kurikoshi too, if were planning to have it. Match the two marks you made in the marking stage, and sew between them (right image). On the wrong side, press the kurikoshi down (left) so it is going up on the right side (bottom image).

3. Side seams
Match the markings on the back section and front section and sew them together. Reinforce the top part of this side seam by sewing on a little square patch, 15 mm x 15 mm (top figure, the little square). Press the front away from the back, and press the SA towards the front section. Fold the SA edge under by 1 cm, and invisibly sew the SA to the front piece. This can be achieved by had or by machine using a blind hem function. Because I don’t have a blind hem option, I generally do this by hand using a stitch called 耳ぐけ/mimi guke.
Since you will need the section of side seam at the sleeve open flat, you will need to open this side seam at a certain point (bottom figure). There’s no precise rule for this, so determine it by trial and error .

Make sure the fold at the shoulder corresponds to your markings as you will need this later for attaching the sleeves. In particular, pay attention to the kata haba as you should have a marking there which corresponds to kata haba + 4 mm. Fold at the kata haba, keeping this marking inside the SA.
If your fabric is very sheer, you can press and sew the side seam flat instead.
4. Okumi
Take your marked okumi and hem the long side which will be the lateral edge of your kimono (top figure). Do not hem the bottom edge just yet. Now match your okumi markings with the markings on the front piece and sew them together, with an additional 2 to 3 cm sewn at an angle so it matches the marking you have done for the diagonal line of the okumi (middle figure). Press the okumi away from the body (don’t forget the turn of cloth) and invisibly tuck the seam allowance down as described above.

5. Eri
The eri (collar) is the trickiest part as it requires precision and the most basting While pinning is generally fine, in this case I do recommend some hand sewing as you don’t want to sew the entire thing only to discover it skewed to a side (ask me how I know haha).
Take your eri with the side where the SA is 1 cm on the top, and starting from the center back, match it to the marking you have done on the body piece (eri kata mawari, okumi sagari, and the diagonal part on the okumi). Start from the center back, and match the center of your eri to it and pin it, then place a pin at the point where okumi and eri meet, to give you an idea of how to distribute tension according to the figure below.

Look at the section highlighted by a green rectangle first, enlarged in the figure below. Ideally, you want to match the magenta lines in the body piece to the magenta lines in the collar piece. Use pins or basting thread to help you achieve the best results. Once this section is done, direct your attention to the rest of the collar and distribute the tension as indicated. Take your time with this, as too much tension, and your collar will be crooked, too little tension and it will be loose.

Once you are satisfied with how you distributed the tension, sew this edge down as below.

Now stitch down the eri seki, remembering there’s a stitch line and a fold line. Start by looking at the diagram on the right, and sew the eri seki right sides together, then fold it on the fold line (top left). At this point, also press the seam allowance of the free long side down so it’s easier to sew later, and flip the entire thing right side out. You can not sew it down with a ladder stitch by hand, or stitch in the ditch by machine (bottom). Please remember your markings, especially considering that the eri seki and the back eri are of different widths, so resist the temptation to press it all down to the same width and rather follow your original markings.

Before moving onto the kake eri, permanently baste your eri down as indicated by the blue markings on the figure below.

6. Kake Eri
Fold your kake eri in half and match it with the rest of the collar, remembering that the kake eri has a SA of 1 cm per side, which you will tuck down in the following steps. Pin it down to check that the proportions and position are correct (top figure). Fold the longitudinal SA down on both sides, and sew down the short sides (middle figure, right). Press on fold line, and sew the Kake eri down to the eri (middle figure, left). The final result should be like presented in the bottom figure.

7. Attach sode to the body
You are almost done! Take your sleeve and match the sode take marking to the marking corresponding to the sode take on the body piece (which should be kata haba + 4 mm, therefore your marking should be 4 mm removed from the fold line). Sew them together, tapering towards the edge as indicated by the illustration, and reinforcing the edge with a small square of cloth as you did for the side seams.

Press the sode SA towards the ode and secure it down invisibly. Finish securing down the rest of the side seams as well.
8. Finishing
Ir’s now time to hem this thing. You already have sewn the lateral hems (the okumi longitudinal hems) down, so it’s time to connect the hem hem to the side hems. Does this make sense?
Start by marking and pressing down your hem as indicated in the diagram on top right. Once you are satisfied with the results, fold the entire thing and press it down (top center, top left). I think it helps to baste it in place as well. Then, proceed to sewing it down permanently (center figure, right to left) There are various methods to do this so pick whichever works best for you. I generally hem invisibly by hand, but machine hemming also works fine.

Once everything is said and done, the inside of your kimono should look like this. Now give the whole thing a good press and admire your hard work. You did it.

Hope you found this very simplified and yet multi-part series helpful.
Happy sewing,
Emilia

This series is exactly what I was looking for. Thank you.
LikeLike
Thank you so much for documenting this. I’ve gone back to it so many times over the past months making my first, then second, then third yukata. It’s been a very helpful resource!!
My next journey is pants, and as a small woman who does not want to wear feminine clothes I think I’ll be looking through your blog a lot more as well. Thank you!
LikeLike
Oh wow I admire your commitment! Pants are an entirely different ballpark as well, good luck with that and hope you have fun.
LikeLike